Welcome to GS1 US Data Hub Help Center
Did you license a GS1 US GTIN and want to create a barcode? Learn how to work with this GTIN in GS1 US Data Hub.
Welcome to GS1 US Data Hub Help Center
Did you license a GS1 US GTIN and want to create a barcode? Learn how to work with this GTIN in GS1 US Data Hub.
After you create your items that are sold to consumers, you can now create the cases that contain these items for shipping/receiving. Follow these steps to create a case that is NOT expected to pass through point of sale. GS1 US Data Hub assigns a different GTIN than the GTIN that this case contains, and enable you to generate the ITF-14 or GS1-128 barcode.
Important: Before creating the case, first create the GTIN for the "child" product that will be added to this "parent" case in GS1 US Data Hub.
1. Click Product, then the Add New Product link.
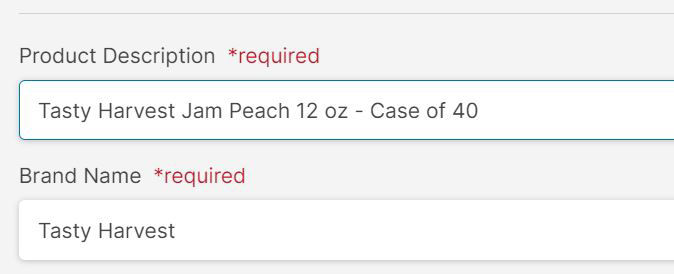
2. Product Description – One best practice is to use the product description of the item that is contained in the case, followed by the actual number contained in this case, such as "Case of 24". There is a 500-character limit. Here's an example:
Language – This is the language for the Product Description and Brand Name. The default is "en" - English." If this product’s primary target market uses a local language other than English, you can change it here. Have an additional language to add? In Step 3 - Enhance Your GTIN Data, you can add an additional product description and brand name and indicate an additional language.
3. Brand Name – Enter the name of the product line that is used with consumers. There is a 70-character limit.
4. Industry – Select the primary industry where the product is sold. Here are definitions of two of the options:
- CPG = Consumer Packaged Goods (groceries, personal care products, etc.);
- General = General Merchandise (toys, flooring, appliances, etc.)
5. Packaging Level – Select "Case" if this packaging contains quantities of just a single GTIN. If quantities of several GTINs are going into this case, you must select "Mixed Case." View the Packaging Level Definitions page for more.
6. SKU (optional) - Enter the Stock Keeping Unit (SKU), which is assigned to the item by your company for inventory tracking purposes, and can be alphanumeric. There is a 70-character limit.
7. Purchasable by Consumer? – Because you selected "Case" as the packaging level, "No" is selected - this ensures the ITF-14 and GS1-128 shipping/receiving barcodes are available after you assign a GTIN.
8. For Shipping Purposes Only? - Because you selected "Case" as the packaging level, “Yes” is selected. This ensures the ITF-14 and GS1-128 shipping/receiving barcodes are available after you assign a GTIN.
9. Variable Measure? – leave this box unchecked. Trade items may be of variable measure either because the production process does not guarantee consistency in weight, size, or length (e.g., meat, whole cheeses) or because the items are created to meet a special order that states a quantity (e.g., textiles ordered by the foot, glass ordered by the square yard).
10. Click the "Add Contents" link to select the item that is placed into this case.
The Add GTIN to Container window displays. Click the box for the product you want to add to this case. Then click the "Add to Container" button.
11. The window closes and the child product displays on the screen. In the Qty field, enter the quantity of this GTIN to be placed into the container. If you accidentally selected the wrong item, click the "Remove" link, then click "Add Contents" again to select a different item.
Note: Once you set the status to In Use, discussed in a later step, you cannot change the contents or the quantity.
12. Click the Save and Continue button. Now you're ready to assign the GTIN to this case. You have three options:
a. Let Us Assign Your GTIN - When you select this option, and "Yes" was selected for Shipping Purposes Only?, GS1 US Data Hub automatically assign a GTIN-14 to the case. A GTIN-14 is used for shipping and receiving items because it is contained in both the ITF-14 and GS1-128 barcodes. The GTIN-14 is also assigned if you select Inner Pack, Pallet or Display Shipper and ONLY select a single product into the container. Here's an example:
To learn more about the GTIN-14, read An Introduction to the Global Trade Item Number (GTIN).
Note: The GTIN-14 uses the same “Item Reference" as the item that was added to this shipping and receiving item. Item References are what determine the number of GTINs that you can assign (also known as your "GTIN Capacity"). So when the GTIN-14 is assigned, the number of "Available" GTINs for your Company Prefix is not reduced. The "Available" number is displayed on the GS1 US Data Hub home page (the screen example is shown here).
Keep in mind that if you select the "Mixed Case" packaging level, the GTIN-14 is NOT assigned, as there are two or more unique GTINs contained in a Mixed Case, and a single Item Reference can't be applied. So the Mixed Case GTIN does use an Item Reference, and does reduce the GTIN capacity.
b. Choose a Specific GTIN - Allows you to type the desired GTIN yourself and assign it to a specific product;
c. Assign GTIN from Reserved – Allows you to specify a GTIN from GTINs that you have already reserved GTINs for this product or group of products.
13. After you assign the GTIN, the item moves from Draft to PreMarket status. You can now click the Barcode tab and click the "Preview Barcode" button to generate a “For Placement Only” (FPO) barcode. This watermark barcode is for product and packaging design purposes. To generate the final, scannable barcode, you will need to change the status to In Use.
14. When you have finalized barcode placement within the packaging design, and you're ready to share this product with the marketplace, you need to set the status to In Use. This is an important step. After the status is set to In Use, the GTIN is permanently assigned to the product. And the Quantity cannot be changed, so if the quantity of the case changes in the future, you will need to create a new case and assign a new GTIN.
Here are three questions to consider before taking this step:
- Are the product attributes and packaging final?
- Are the “Child” item and Quantity in the case final?
- Are you ready to share this information with trading partners?
Note: You can only set the upper-level package to In Use when the child GTIN(s) is In Use.
If the answer to these questions is “yes”, click the Set Status to In Use button.
15. To view the barcode, click the View Barcode button.
- Application Area – The environment in which the barcode will be scanned. The list of available application areas is based on your product details.
- Barcode Type – The selected barcode symbol. Because you have selected "Case" and unchecked the box for "Item can be purchased by the consumer," the two options are ITF-14 and GS1-128.
Adding Application Identifiers: When creating a barcode, only certain barcodes can generate Application Identifiers (AIs), such as the GS1-128. When you select GS1-128, the Application Identifier section displays so you can customize your barcode.
Note: Application Identifier AI (01) GTIN is automatically generated from the selected GTIN. The Additional Application Identifiers section allows you to add more AI’s to the barcode (i.e. Batch or Lot Number, Product Date, Packaging Date, Best Before Date, Expiration Date, etc.).
- Click Select an AI and type ** to see all available AI’s.
- Enter the corresponding info under Application Identifier Value (e.g., choosing **11 Production Date (YYMMDD), you would fill in a date such as 210801 for August 1st, 2021).
- Size – For the ITF-14 and GS1-128 barcode options, two barcode dimensions are available: optimum ("Target") and Maximum "X-dimensions." The numbers provided are the X-dimension and the minimum symbol height for each of the X-dimensions. An X-dimension is defined as the specified width of the narrowest element of the barcode, and is used together with the symbol height to specify the permissible symbol size. U.P.C. barcodes have a fixed relationship between barcode height and width, so if one dimension is modified, the other dimension must be altered by a proportional amount. Do NOT resize or crop these barcodes.
16. Click Preview Barcode - View and download your barcode symbol, which is .PNG file. Please note that an EPS (or vector file) is not provided.
- Export Barcode Definition- Download the barcode symbol specifications as a worksheet to be shared with GS1 Standards Barcode and Image Professional Print Vendors.
Learn More: View the Product Create/Manage User Guide in this Help Center.
Also, view the Creating a Case instructional module in the GS1 US University Learning Management System.