
Once on the My Products Page, click Add New Product

Create a Product and Generate a Barcode
To generate a barcode image for a product sold to consumers, you first need to create a product, assign an available Global Trade Item Number® (GTIN®), and then click the Set Status to In Use button.
Note: Did you license single GS1 US GTIN, instead of a GS1 Company Prefix? Then your product is already set to the In Use status. Visit the GS1 US GTIN article to learn how to generate your barcode, create a case, etc.
For step-by-step instructions on creating your product/GTIN and generating a barcode, see below:

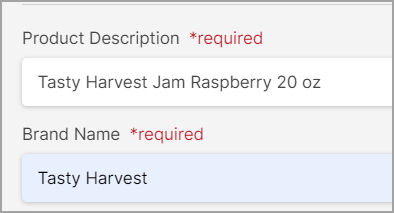
- Product Description
This is a "functional description" to share with retailers, NOT the marketing description that is used for consumers. A best practice is to include brand name, type of product, variation (color, flavor, scent, etc), and net contents. There is a 200-character limit on this field.
- Language
This is the language for the Product Description and Brand Name. The default is "en" - English." If this product’s primary target market uses a local language other than English, you can change it here. Have an additional language to add? In Step 3 - Enhance Your GTIN Data, you can add an additional product description and brand name and indicate an additional language. - Brand Name
Enter the name of the product line that is used with consumers. There is a 70-character limit.
- Industry
Select the primary industry where the product is sold. Here are definitions of two of the options:- - CPG = Consumer Packaged Goods (groceries, personal care products, etc.);
- - General = General Merchandise (toys, flooring, appliances, etc.)
- Packaging Level
Leave "Each" selected, as this is the Packaging Level used for items sold to consumers. Learn how to enter a case for shipping and receiving. - SKU (optional)
This is the Stock Keeping Unit that your company may assign to products to help track inventory. The SKU can be alphanumeric. There is a 70-character limit. You can add or change the SKU for this product, even after you set the status to In Use. - Purchasable by Consumer?
Leave "Yes" selected. This ensures that a UPC-A will be generated in a later step. - For Shipping Purposes?
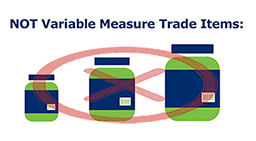
Leave "No" selected. - Variable Measure? Leave this box unchecked. Trade items may be of variable measure either because the production process does not guarantee consistency in weight, size, or length (e.g., meat, whole cheeses) or because the items are created to meet a special order that states a quantity (e.g., textiles ordered by the foot, glass ordered by the square yard). View the variable measure article to learn more.
- Click the Save and Continue button.
This product detail record is in the Draft status. The Step 2 page displays.
Click the Let Us Assign Your GTIN button. GS1 US Data Hub will assign the next available GTIN to this product, based on your GS1 Company Prefix. This available GTIN displays under the Your GTIN heading as both a GTIN-12 and a GTIN with 14 digits, with two leading zeroes (this is how GTINs are typically stored in databases).
Optional:
Choose a Specific GTIN
If you have already assigned a GTIN to this product, perhaps in another database, enter the desired GTIN yourself and assign it to a specific product; if you are creating the GTIN, learn about the Check Digit Calculator.
Assign GTIN from Reserved
You can specify a GTIN from GTINs you have reserved for this product or group of products.
After you assign the GTIN, the item moves from Draft to PreMarket status.
Optional:
View an "FPO" Barcode
When the GTIN is in the PreMarket status, click the View Barcode button to generate a “For Placement Only” (FPO) barcode. This watermark barcode is for product and packaging design purposes only. To obtain the "final" barcode, you will need to click Set Status to In Use (see next step).
Add Additional Product Information.
Consider adding other product information in Step 3 and Step 4, such as net contents and net weight. Keep in mind that some of these attributes cannot be changed after you set the status to In Use.
While in the PreMarket status, you can change key attributes before finalizing. When you're ready to share this product with the marketplace, click the Set Status to In Use button.

After the product is set to the In Use status:
- The GTIN is permanently assigned to the product;
- You cannot delete this GTIN. Rather, you must Archive this GTIN if this product is discontinued in the future. Learn more about deleting a GTIN.
If key attributes need to be changed, such as unit of measure or net contents, you will have to create a new product and assign a new GTIN. So here are three questions to consider before taking this step:
- Are the product attributes and packaging final?
- Are you ready to produce and sell this product to consumers?
- Are you ready to share this information with trading partners?
- Click the View barcode button to view the barcode image.

- Click the dropdown and select an option under How will this barcode be used?
The options are Retail Point of Sale or Both Retail Point of Sale and Distribution. The type of barcode generated will depend upon which option is selected.
- Download Barcode
View and download your barcode symbol in either EPS or PNG file format.
Note: EPS files can only be opened with specialist design software, and will retain resolution regardless of scale. A PNG is a standard image file format that is compatible with most applications.
If you need to enter one or more items that are similar to a product that's already been entered, you can save time and reduce the risk of manual errors by using the Clone feature. To Clone a product, take these steps; (Note: This tool is not available for Draft products.)
- From the My Products page, click the GTIN link of the product. The Product Detail page displays. From the Product Detail page, click the Clone This Product button

- Confirm you are cloning the right product by clicking Continue.

- Change the attributes for the new product as needed. The following attributes are copied;
- Product Description - Contains the word "copy" at the end
- Brand Name
- Product Industry
- Packaging Level
- Dimensions - Update these dimensions as needed. Once set to In Use, changes to these attributes are limited.
- Weight - Update these dimensions as needed. Once set to In Use, changes to these attributes are limited.
- SKU
- Comments
You may want to reserve GTINs for a future date (i.e., to assign GTINs to a product category being launched at a later date.) To reserve GTINs, follow these steps;
- Click Product, then Reserved GTINs. The Reserved GTINs page displays. Click Add Reserved.

- The Add GTINs to Reserved window displays. Enter the quantity of the GTINs you want to reserve. Click the Reserve button.

- The reserved GTINs will display based on the quantity you entered. The following fields display on the Reserved GTINs page;
- Prefix - The GS1 Company Prefiux used to create the GTIN of a product
- GTIN - The 14-digit representation of the Global Trade Item Number as it would be stored in a database
- Date Reserved- The date the GTIN was reserved
- Reserved by- The user in your company who placed the GTIN into the reserved status

GTIN Creation and Barcode Generation Guide: